Tips
General tips

- Make a serious attempt to build your own tools, every chance you’ve got (if possible): it’s very rewarding
- Remember: working with wood is very different than working with metal… for the later you’ll certainly need a stronger metallurgy vise to withhold your work
- Patience: “good things come to those who wait” as Guinness promotes (or was it Heinz? I’m too old to remember)
More tips
- Apply duct tape behind your sand paper sheets: they’ll never rip on you again!
- Reinforce your sash clamps with scraps of wood (Paul Sellers details this on a video entitled “Clamp Retrofit“)
- Rob Cosman’s F-Clamp handle (video) idea, to increase the grip on the handle
- Extending your clamps (using your specially designed fast clamp or a block of wood with holes)

- Buy and learn how to use a Japanese Saw: small kerf, flexible (reaching areas with difficult access), crosscut and ripcut on one tool, cheap (£30 tops). Start with a Ryoba model
- Mind that to use this tool with accuracy, you need to first work on a “path of least resistance”, ie, a groove that your sawing ‘shall’ follow: it’s really really easy for it to ‘deviate’ course. You need to keep changing faces and orientations to ‘make’ it go straight down the desired path. Watch YouTube videos on this.

Woodworking tips
- Don’t buy a N.5 plane (at least not ‘now’) for violin making: you probably don’t need it. A N.4 standard (decent) plane is all you need
- In a sense, you don’t even need a block plane!
- “Play” with hide glue in other wood/projects before working on a violin: prepare it, learn your consistencies, put on fridge, restart it
- Have at your hand’s length at all times a couple of fast clamps: sometimes you have to hold the piece AND clamp, and sadly, you don’t have three hands to do it…
- Learn how to sharp: plane blades, chisels, gouges, and rasps/scrapers using the method you like
- There are a bunch of videos on YouTube detailing how to sharp woodwork tools (I’d recommend Paul Sellers and also Wood by Wright videos)
- Separate your file types: have a set for metal work and a set for wood work
- Buy a caliper: you will use many times for violin making and template building. I particularly don’t like the electronic ones: the batteries seem to end right right before I want to use it…
Miscellanea
- When trying out pyrography (ie, branding your templates or embossing things in wood), get your hands on stencils.
- I’ve bought a set consisting of Black Carbon Transfer Paper and Tracing Copy Paper with 5 Pieces Double Ended Tracing Ball Embossing Stylus Dotting Trace Tools for Wood and Paper on Amazon (£8 on October/23)
More general tips
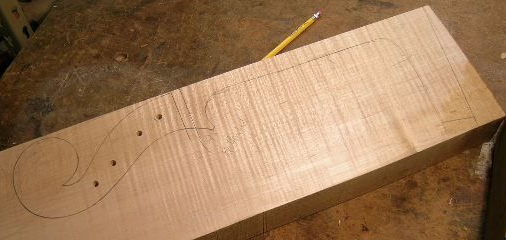
- When working on the pegholes in the pegbox:
- Be careful of tear out – do things slow.
- Start holes spinning it inverted first, to scratch the wood first, then proceed to the right direction.
- Use sharp brad-point drills under the size you want and then carefully ream (using the reamer tool) to the finished size.
- Drilling the peg holes in from both sides is quite useful as well, as well as drilling before final thicknessing of the pegbox walls.
- Try to drill them while the block is square (before everything – see figure below) on a small table top drill press. Drill them undersize (5.5mm for a 4/4 violin – Making the Violin website recommends 6mm), just big enough to get the reamer in.
- Purfling notes:
- This task (if manually) takes a lot of time and effort. Instead of doing one pass with dual blades, do two passes with single blades:

- First cutter is not cutting (inverted in the tool), whereas now you need two passes to finish the purfling channel.
- Saddle: if too tight, it might expand and crack the wood underneath it – it should allow wood expansion. See discussion in Maestronet about this.
- Branding iron for bridges: see related discussions on Build a Branding iron for violin bridge and on Bridge stamp thread (both on Maestronet).
Epilogue
Bookmark and visit this page from time to time, as I plan to keep adding entries as I learn new things.